Starting Block Breaker
We don’t use any assets in block breaker, so you can start your project however you like most. If you use the Bevy CLI with bevy new, which results in the default minimal Bevy template, make sure you have Bevy 0.18 in the Cargo.toml.
bevy new block-breakercargo new block-breaker
cd block-breaker
cargo add bevy@0.18Your Cargo.toml should look like this if you used bevy new. If you used cargo new, the important parts are the [package] section and the bevy dependency; Everything else is optional.
[package]
name = "block-breaker"
version = "0.1.0"
edition = "2024"

[dependencies]
bevy = "0.18"
# Set max log levels. This helps avoid unwanted low-severity log spam, which can affect performance.
log = { version = "0.4", features = [
    "max_level_debug",
    "release_max_level_warn",
] }
tracing = { version = "0.1", features = [
    "max_level_debug",
    "release_max_level_warn",
] }

# Idiomatic Bevy code often triggers these lints, and the CI workflow treats them as errors.
# In some cases they may still signal poor code quality however, so consider commenting out these lines.
[lints.clippy]
# Bevy supplies arguments to systems via dependency injection, so it's natural for systems to
# request more than 7 arguments -- which triggers this lint.
too_many_arguments = "allow"
# Queries that access many components may trigger this lint.
type_complexity = "allow"

# Enable a small amount of optimization in the dev profile.
[profile.dev]
opt-level = 1

# Enable a large amount of optimization in the dev profile for dependencies.
[profile.dev.package."*"]
opt-level = 3

# Remove expensive debug assertions due to <https://github.com/bevyengine/bevy/issues/14291>
[profile.dev.package.wgpu-types]
debug-assertions = false

[profile.release]
# Compile the entire crate as one unit.
# Slows compile times, marginal improvements.
codegen-units = 1
# Do a second optimization pass over the entire program, including dependencies.
# Slows compile times, marginal improvements.
lto = "thin"
Spawning a Ball
The first action we’re going to take is to spawn a ball into the game and make it move around the screen.
To do this we’ll need to
- Spawn an
Entitywith aCamera2dcomponent - Spawn an
Entitywith a circle to render as the ball - Write a new
Systemto adjust the Ball’sTransformcomponent each frame
The Camera
In src/main.rs, we’ll add a new system called startup to the Startup schedule, which will run once when the application starts for the first time and spawn our camera.
We configure the camera’s behavior by inserting a Resource called ClearColor. In-between frames, the clear color is used to wipe the screen clean before rendering again. As a result, if nothing renders in a given location on screen this frame, we will see the clear color rendered instead. The ClearColor resource represents the default clear color for all cameras, which can be overridden on any individual camera as well.
In the startup system, we spawn an Entity with the Camera2d component, which enables 2d rendering for our application.
use bevy::{color::palettes::tailwind::*, prelude::*};
fn main() -> AppExit {
App::new()
.insert_resource(ClearColor(Color::from(SKY_950)))
.add_plugins(DefaultPlugins)
.add_systems(Startup, startup)
.run()
}
fn startup(mut commands: Commands) {
commands.spawn(Camera2d);
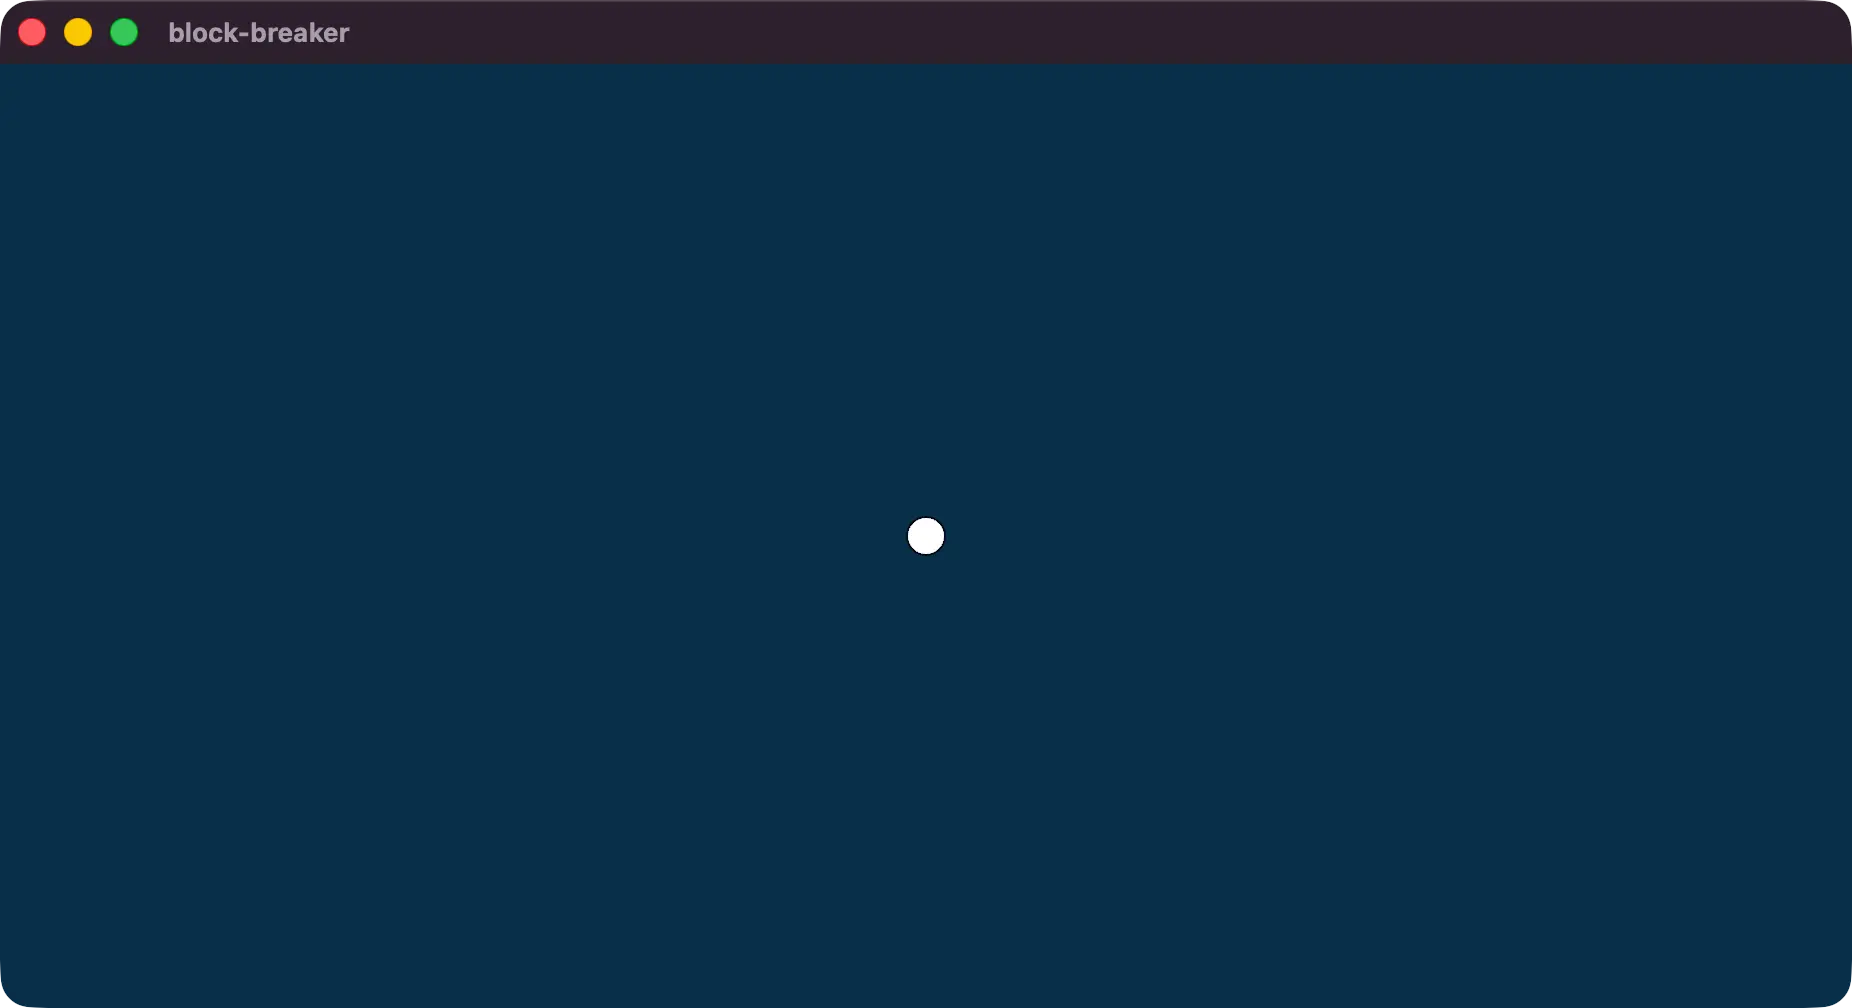
}When running the app (with bevy run or cargo run), the screen now shows the clear color we chose.
Spawning the Ball
In the same startup system we want to spawn a ball and give it a velocity we can adjust during gameplay as the ball hits walls, bricks, and the paddle.
We’ll define a ball size at the top of the file.
const BALL_SIZE: f32 = 10.;And two new components:
Ballwhich is a marker component to identify the ball in queries laterVelocity, which holds theVec2representing how fast the ball is moving and in which direction
#[derive(Component)]
struct Ball;

#[derive(Debug, Component)]
struct Velocity(Vec2);
Our startup system will also have to change. We’ll use a Mesh2d instead of a Sprite, which will give us access to a circle mesh instead of the Sprite’s rectangle. The Mesh2d is a newtype component that holds a value of Handle<Mesh>. The Mesh2d indicates that this is supposed to be rendered as a 2d Mesh which shows up on 2d cameras, even though the 2d and 3d representations of a mesh are the same, so the Handle<Mesh> still points to a generic Mesh asset type.
A Mesh2d’s color is defined by the material asset in the MeshMaterial2d component. A MeshMaterial2d will hold any Material2d implementation, which means this is also the component that would hold any custom shaders if we had any. For now we’ll use a ColorMaterial, which renders the color we give it (or the image if we had one).
Since ColorMaterial and Mesh are both Assets, we can access their respective asset collection using the Assets resource. We use ResMut here because we’re going to add new meshes and materials to these collections, and thus have to mutate the collection!
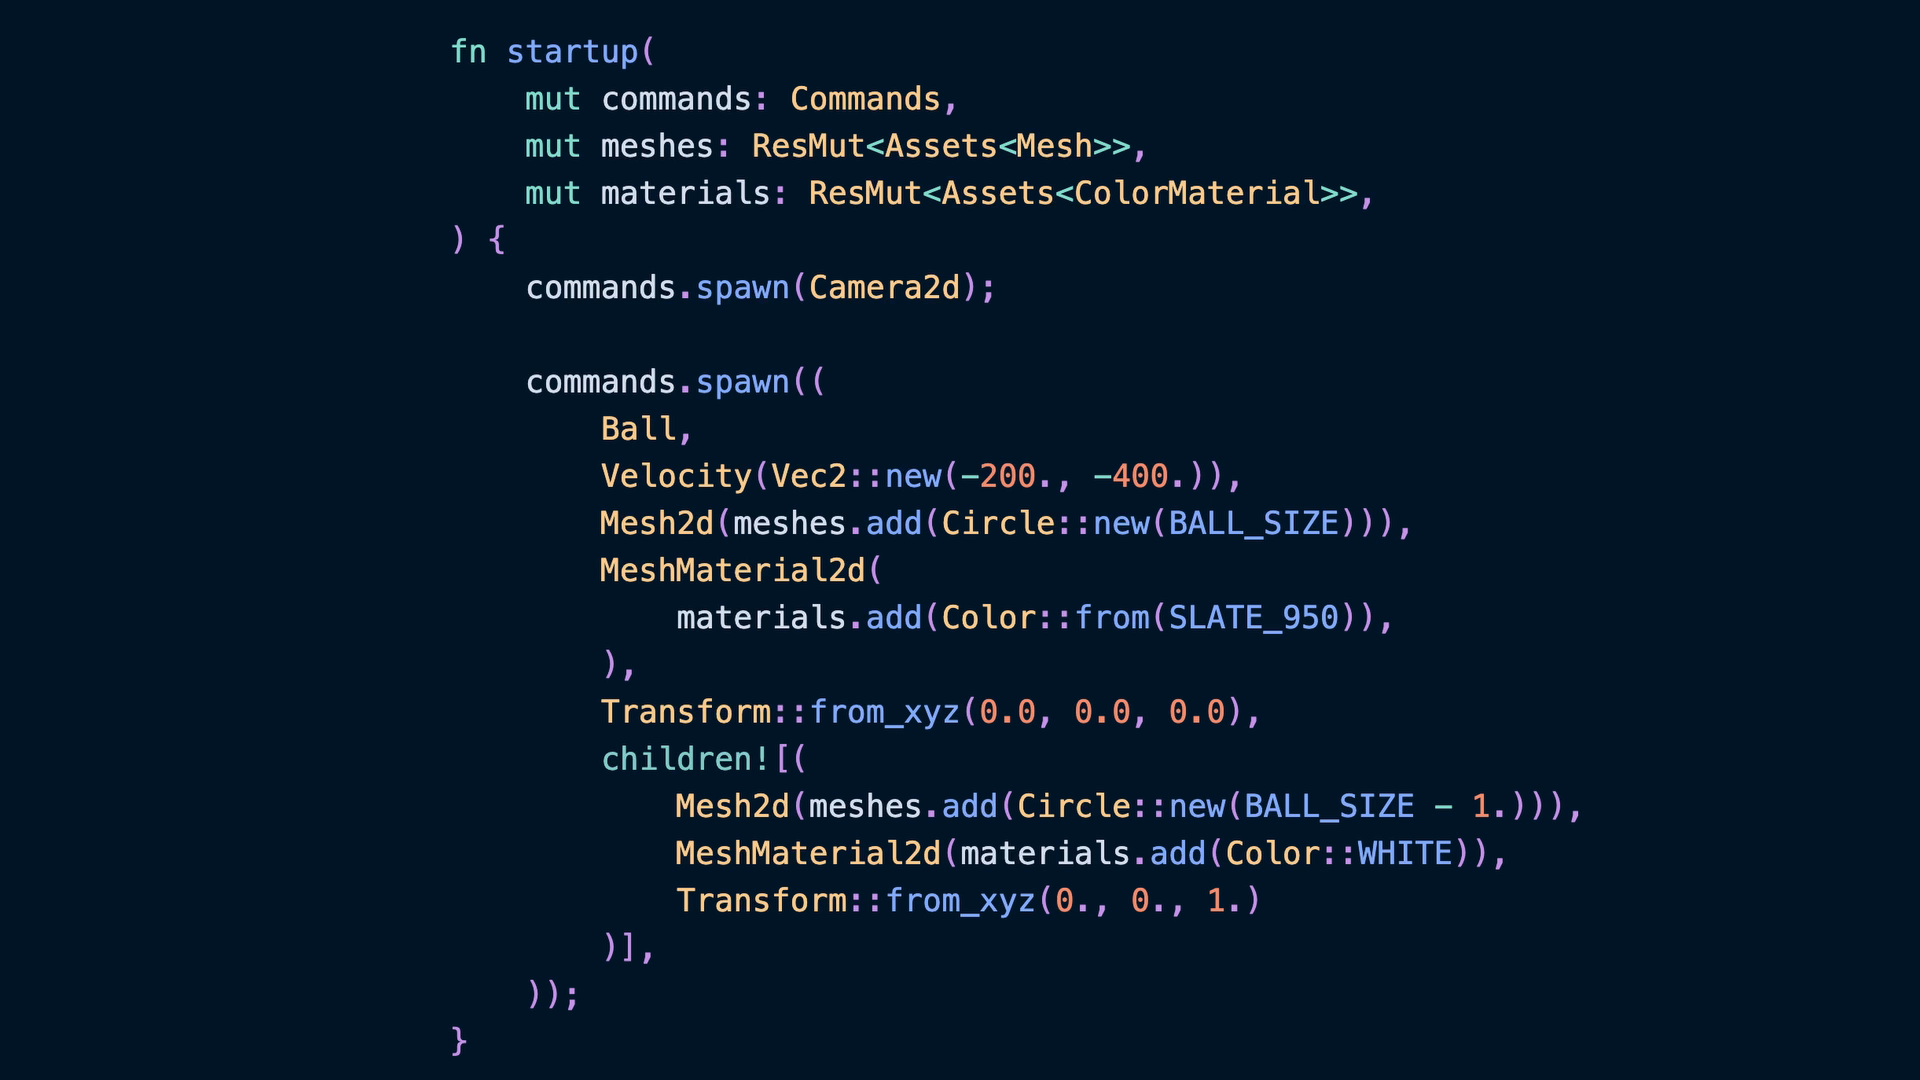
We use two entities with a Parent/Child relationship here to implement an outline for the ball. The parent mesh is the darker color outline here, and the inner mesh is 1 px radius smaller. The z-index of our Transforms further enforce that the child is going to render in front of the the outline mesh.
fn startup(
    mut commands: Commands,
    mut meshes: ResMut<Assets<Mesh>>,
    mut materials: ResMut<Assets<ColorMaterial>>,
) {
    commands.spawn(Camera2d);

    commands.spawn((
        Ball,
        Velocity(Vec2::new(-200., -400.)),
        Mesh2d(meshes.add(Circle::new(BALL_SIZE))),
        MeshMaterial2d(
            materials.add(Color::from(SLATE_950)),
        ),
        Transform::from_xyz(0.0, 0.0, 0.0),
        children![(
            Mesh2d(meshes.add(Circle::new(BALL_SIZE - 1.))),
            MeshMaterial2d(materials.add(Color::WHITE)),
            Transform::from_xyz(0., 0., 1.)
        )],
    ));
}- For
Velocity, negative X is left and negative Y is down, which means ourBallwill spawn with a downward, leftward velocity. - The
meshesandmaterialscollections can be added to with new values.
The Assets::add method accepts any type that can be turned Into the Asset type we’ve defined. Any type in Rust that implements From also gets an Into implementation for free! This means a ColorMaterial can be constructed from any Color using its impl From<Color> for ColorMaterial and a Mesh can be built from many different 2d primitives, like Circle.
note
More generally any 2d primitive that implements Meshable could be useful here.
Moving the ball
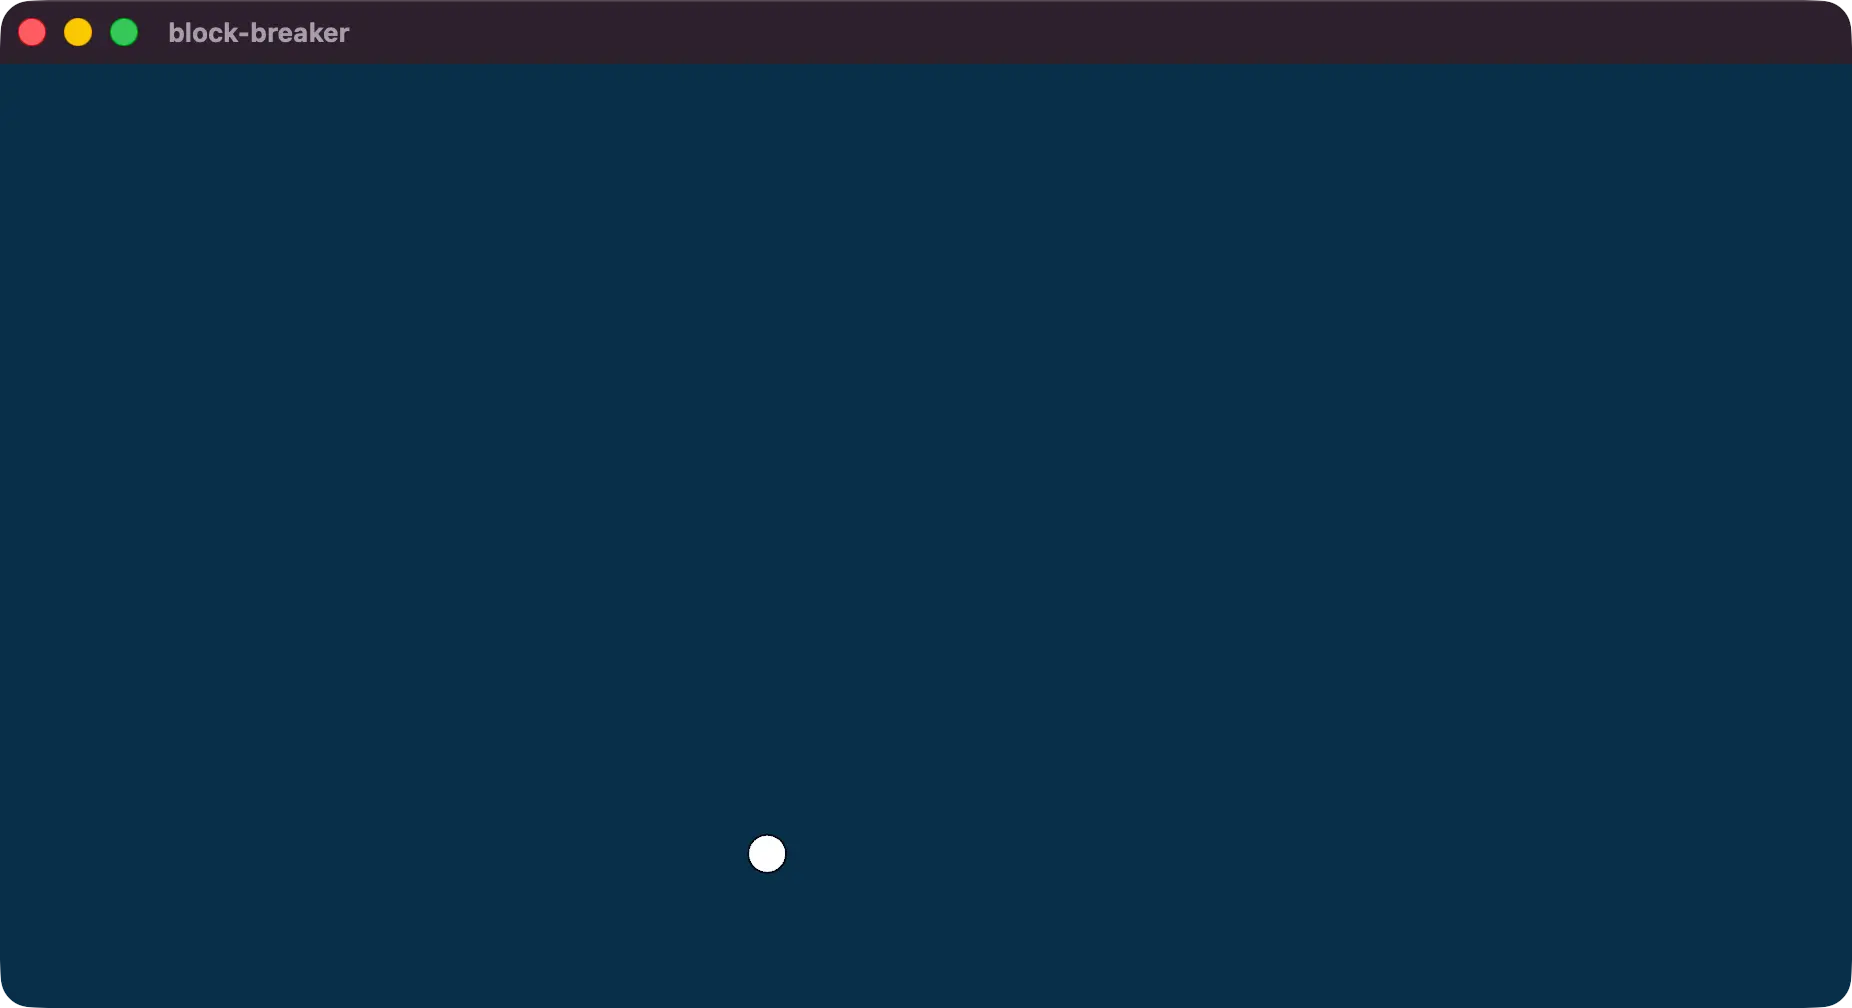
To move the ball on screen, we need to write a system that queries for the Velocity and Transform components on the Ball entity, then uses the velocity to adjust the Transform translation.
Our new system will be ball_movement in the FixedUpdate schedule. We use FixedUpdate for this because it is a core gameplay feature that will rely on the amount of time that has passed. Using FixedUpdate means our logic will be framerate-independent, unlike if we used the Update schedule. Being framerate-independent means if a user with a faster (or slower) monitor or computer runs the game, the ball won’t speed up, slow down, or have other unintended effects.
note
Generally speaking, use Update if you’re reading user input or defining how something renders, like a transition.
Use FixedUpdate if it affects gameplay mechanics and needs to behave the same across different computers.
fn main() -> AppExit {
    App::new()
        .insert_resource(ClearColor(Color::from(SKY_950)))
        .add_plugins(DefaultPlugins)
        .add_systems(Startup, startup)
        .add_systems(FixedUpdate, ball_movement)
        .run()
}
The ball_movement system queries for the Transform and Velocity components that are on the same entity the Ball component is on. We use &mut Transform here because we’re going to mutate the value, which is also why we write mut balls.
We also need access to the amount of time that has passed, which we can get from the Time resource.
The code loops over the balls query with exclusive access so that it can modify the value in transform. Even though we have a single ball now, in block breaker and arkanoid type games it is very common to have powerups that spawn multiple balls! This is one of the reasons it is useful to write this logic as a loop.
fn ball_movement(
    mut balls: Query<
        (&mut Transform, &Velocity),
        With<Ball>,
    >,
    time: Res<Time>,
) {
    for (mut transform, velocity) in &mut balls {
        let ball_movement_this_frame =
            velocity.0 * time.delta_secs();

        transform.translation +=
            (ball_movement_this_frame).extend(0.);
    }
}
The ball will move some distance based on its velocity, which we can calculate by taking the Vec2 in the Velocity component and multiplying it by how much time has passed: delta_secs.
We then add that value to the ball’s Transform::translation. The movement is a Vec2 and the translation is a Vec3, so we extend our Vec2 with a 0 in the z axis, which adds nothing to the z value.
In the next lesson we’ll build out the walls of the arena and implement collision for our ball to bounce around.